Craft your Own Christmas Cards with Silhouette Curio and Mint Desktop Craft Devices

From holiday party invitations to ornaments for the tree, there are a million details to think about during the holidays. If you’re one of those DIY’ers who likes their holidays to have a handmade touch, it’s either time to roll up your sleeves, or call out the big guns.

The Silhouette Curio multipurpose cutting and crafting tool and accessories and the Silhouette Mint custom stamp-maker have all the functions and capabilities you’d ever want to make homemade holiday crafts. Just think of them as cute little digital elves, plugged into the workshop of your imagination.

MAKE YOUR OWN CHRISTMAS CARDS (Shhhh…No one needs to know they’re not store-bought…)

https://vimeo.com/146691680

For this demonstration of the awesome powers of the Curio (only $199) and Mint desktop craft devices, we thought we’d whip up a batch of homemade Christmas cards. First we spent a couple bucks on blank cards and envelopes at the local crafts store. We thought it would look nice to have an embossed border for the card. The snowflake design was not hard to find readily available in the included Silhouette Studio software. The Curio has a dual carriage, so we put the cut tool in the first slot, and the embossing tool in the second slot. We selected the ‘Score and Emboss’ function and in seconds, the machine was passing over the design with a light score mark, and then pushing through the cardstock to create the emboss pattern.

Next we needed a design for the center of the card, contained by the decorative border. The Curio could draw one, if we wanted to use the sketch pen for it. Or why not cut one out of vinyl? We adjusted the blade depth on the cut tool, replaced the embossing mat with the cutting mat, put in a small sheet of GreenStar adhesive vinyl, and cut out our holiday message. Then we weeded and transferred the design with application tape, no problems, for a clean glossy text graphic.

Lastly, who wants to hand-write their address on hundreds of envelopes? With the Silhouette Mint (only $99 now!), you can design a holiday-themed stamp with whatever graphic, text, and other design elements you want. With its easy-to-use software, you can make stamps from any image, including realistic stamps from photos! For our return address stamp, we chose a gingerbread man and some simple text. Just slide the template through the stamp, print in seconds, and get 50-100 uses per inking, on a custom stamp pad that will last years!

Now, this is just one idea, but there are literally hundreds more you could come up with, so put on your inventor hat, and let these little devices work their holiday magic!
UV Printing on Plastic Substrates for ADA Compliant Signage

Find your niche in the signage industry. With a little education and the right equipment, you can open up countless markets surrounding you by fabricating custom signs that conform to ADA (Americans with Disabilities Act) guidelines.

The Americans with Disabilities Act (ADA) is a civil rights law that was initiated in 1992 to “prohibit discrimination and ensure equal opportunity for persons with disabilities in employment, State and local government services, public accommodations, commercial facilities, and transportation,” according to ada.gov.

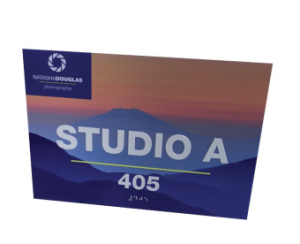
The ADA requires all public places (except government buildings and churches) to install ADA compliant signage that includes tactile lettering, Grade II Braille and in some cases, pictograms.

ADA-Compliant signs require raised Braille code and pictograms.
ADA-Compliant signs require raised Braille code and, in some cases, pictograms.

Check out this helpful white paper from Rowmark which details all the special features and accommodations required by the act. The good news for everyone is that this signage with its special features can be produced quickly and cheaply with the proper UV-LED printing equipment. USCutter has two models in this class you can choose from by Mimaki: the UJF-3042HG and the JXF200-2513.

As the document states: “With the recent development of tactile and raised UV-LED printing, compliant braille signage can be created with an even greater graphics appeal and in a single process requiring minimal operator involvement…[A UV-LED printer can create a standard 6”x8” sign with Braille and raised tactile letters in less than four minutes]…A popular method is to print the required raised letters and braille with UV curable ink to the “first-surface” of the sign. An alternative method is to print graphic elements to the back “second-surface” or “sub-surface,” adding multiple colors and creativity while applying the raised components to the “first” or “top” surface in a two-step process. The ability to create endless designs will build appeal for and acceptance of this new method.”

With low-cost plastic substrates available in different colors and shapes, you can add profitability, versatility, and exclusivity with professional-looking results for a business niche in ADA-compliant signage that is demanding but could be extremely lucrative for your sign shop.

Layering Projects with Siser EasyWeed and Chemica DuoFlex Heat Transfer Vinyl

Making multi-color designs on shirts and other fabrics with heat transfer vinyl is an inexpensive alternative to printing, whether it’s dye-sublimation or Joto paper, or solvent/latex on printable HTV.

Layer Siser EasyWeed for snazzy intricate multi-color designs.

It’s pretty easy to do in the software (RazorCut allows you to separate cutting jobs by color in its spooling function) so you don’t have to switch out rolls of different-colored vinyl to do multiple jobs that contain the same color.

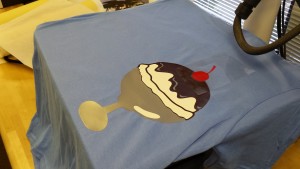
Siser EasyWeed (order NOW by the foot!) can be layered in different colors, with 3 or more layers posing no real problem in terms of difficulty or washability. In the first example shown here, we tried to make a hot fudge sundae decal. It works best for ease of registration to layer sequentially with solid-filled colors. First we chose our image, and then added a white outline around it. This solid-filled white outline became the base. Then we added the silver base and streaks (Siser Easyweed is very easy to register due to its see-through plastic backer-careful not to cut through it with too deep a blade setting), followed by the brown chocolate sauce, and lastly a cherry on top.

Lastly, the cherry on top.

Each layer we pressed for 3 seconds at 320 degrees until the final layer, which received the whole 15 seconds.

For a softer layered look (layers within layers) we also tried the new Chemica DuoFlex (also available NOW by the foot in 4 styles!) which is a two-tone vinyl that shows an accented “outline” when pressed onto a shirt. It is very soft and flexible, making it easy to work with. Like Siser EasyWeed, you cut mirror, into the unfinished colored side. For a cleaner cut, you should choose the “Multi-Cut” feature in your software as it’s thicker and softer than most vinyl. Pressure should be set to light, heat to 320 degrees, for 20 seconds.

Note: If you go with a longer time and lower heat, the material appears to have even more dimensionality and softness of texture.

REMEMBER TO COLD PEEL!

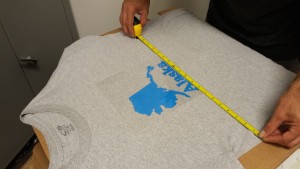
In this other example, we show the results of layering DuoFlex onto a slightly larger blue EasyWeed base.

Positioning is important to get right before the press.

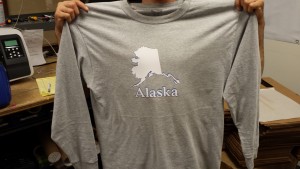
It can be a little harder to register, but notice the red and blue layers and the bright white on top that is washable again and again with a very soft hand for a very red-white-and-blue Alaskan experience.

White on top. Like the real Alaska.
White on the surface. Like the real Alaska.

Not a big fan of white on top?

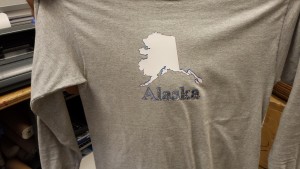
Press on some screenprinting foil for a distressed metallic look

We followed up on the lettering with a strip of screen-printing foil all crinkled up to provide a distressed look, and as you can see that turned out very appealing as well.

These two experiments in heat transfer vinyl show, that if nothing else, there’s no end to the different effects and textures possible once you start piling on the layers.