Vinyl products can be seen everywhere, once you know what to look for. Stickers and decals on car windows and truck fleets, ads on work vans, signs and banners of all kinds, t-shirts and all sorts of apparel. Vinyl is low cost, easy to work with, and provides consistent professional results for all sorts of crafting and decorating projects.
It can’t be a secret what makes all these wonderful vinyl products possible. USCutter sells thousands of vinyl cutters each month, many to first-time users. Our typical new user has an idea for a product or project, did their homework, googled “vinyl cutter” or found us through Ebay.
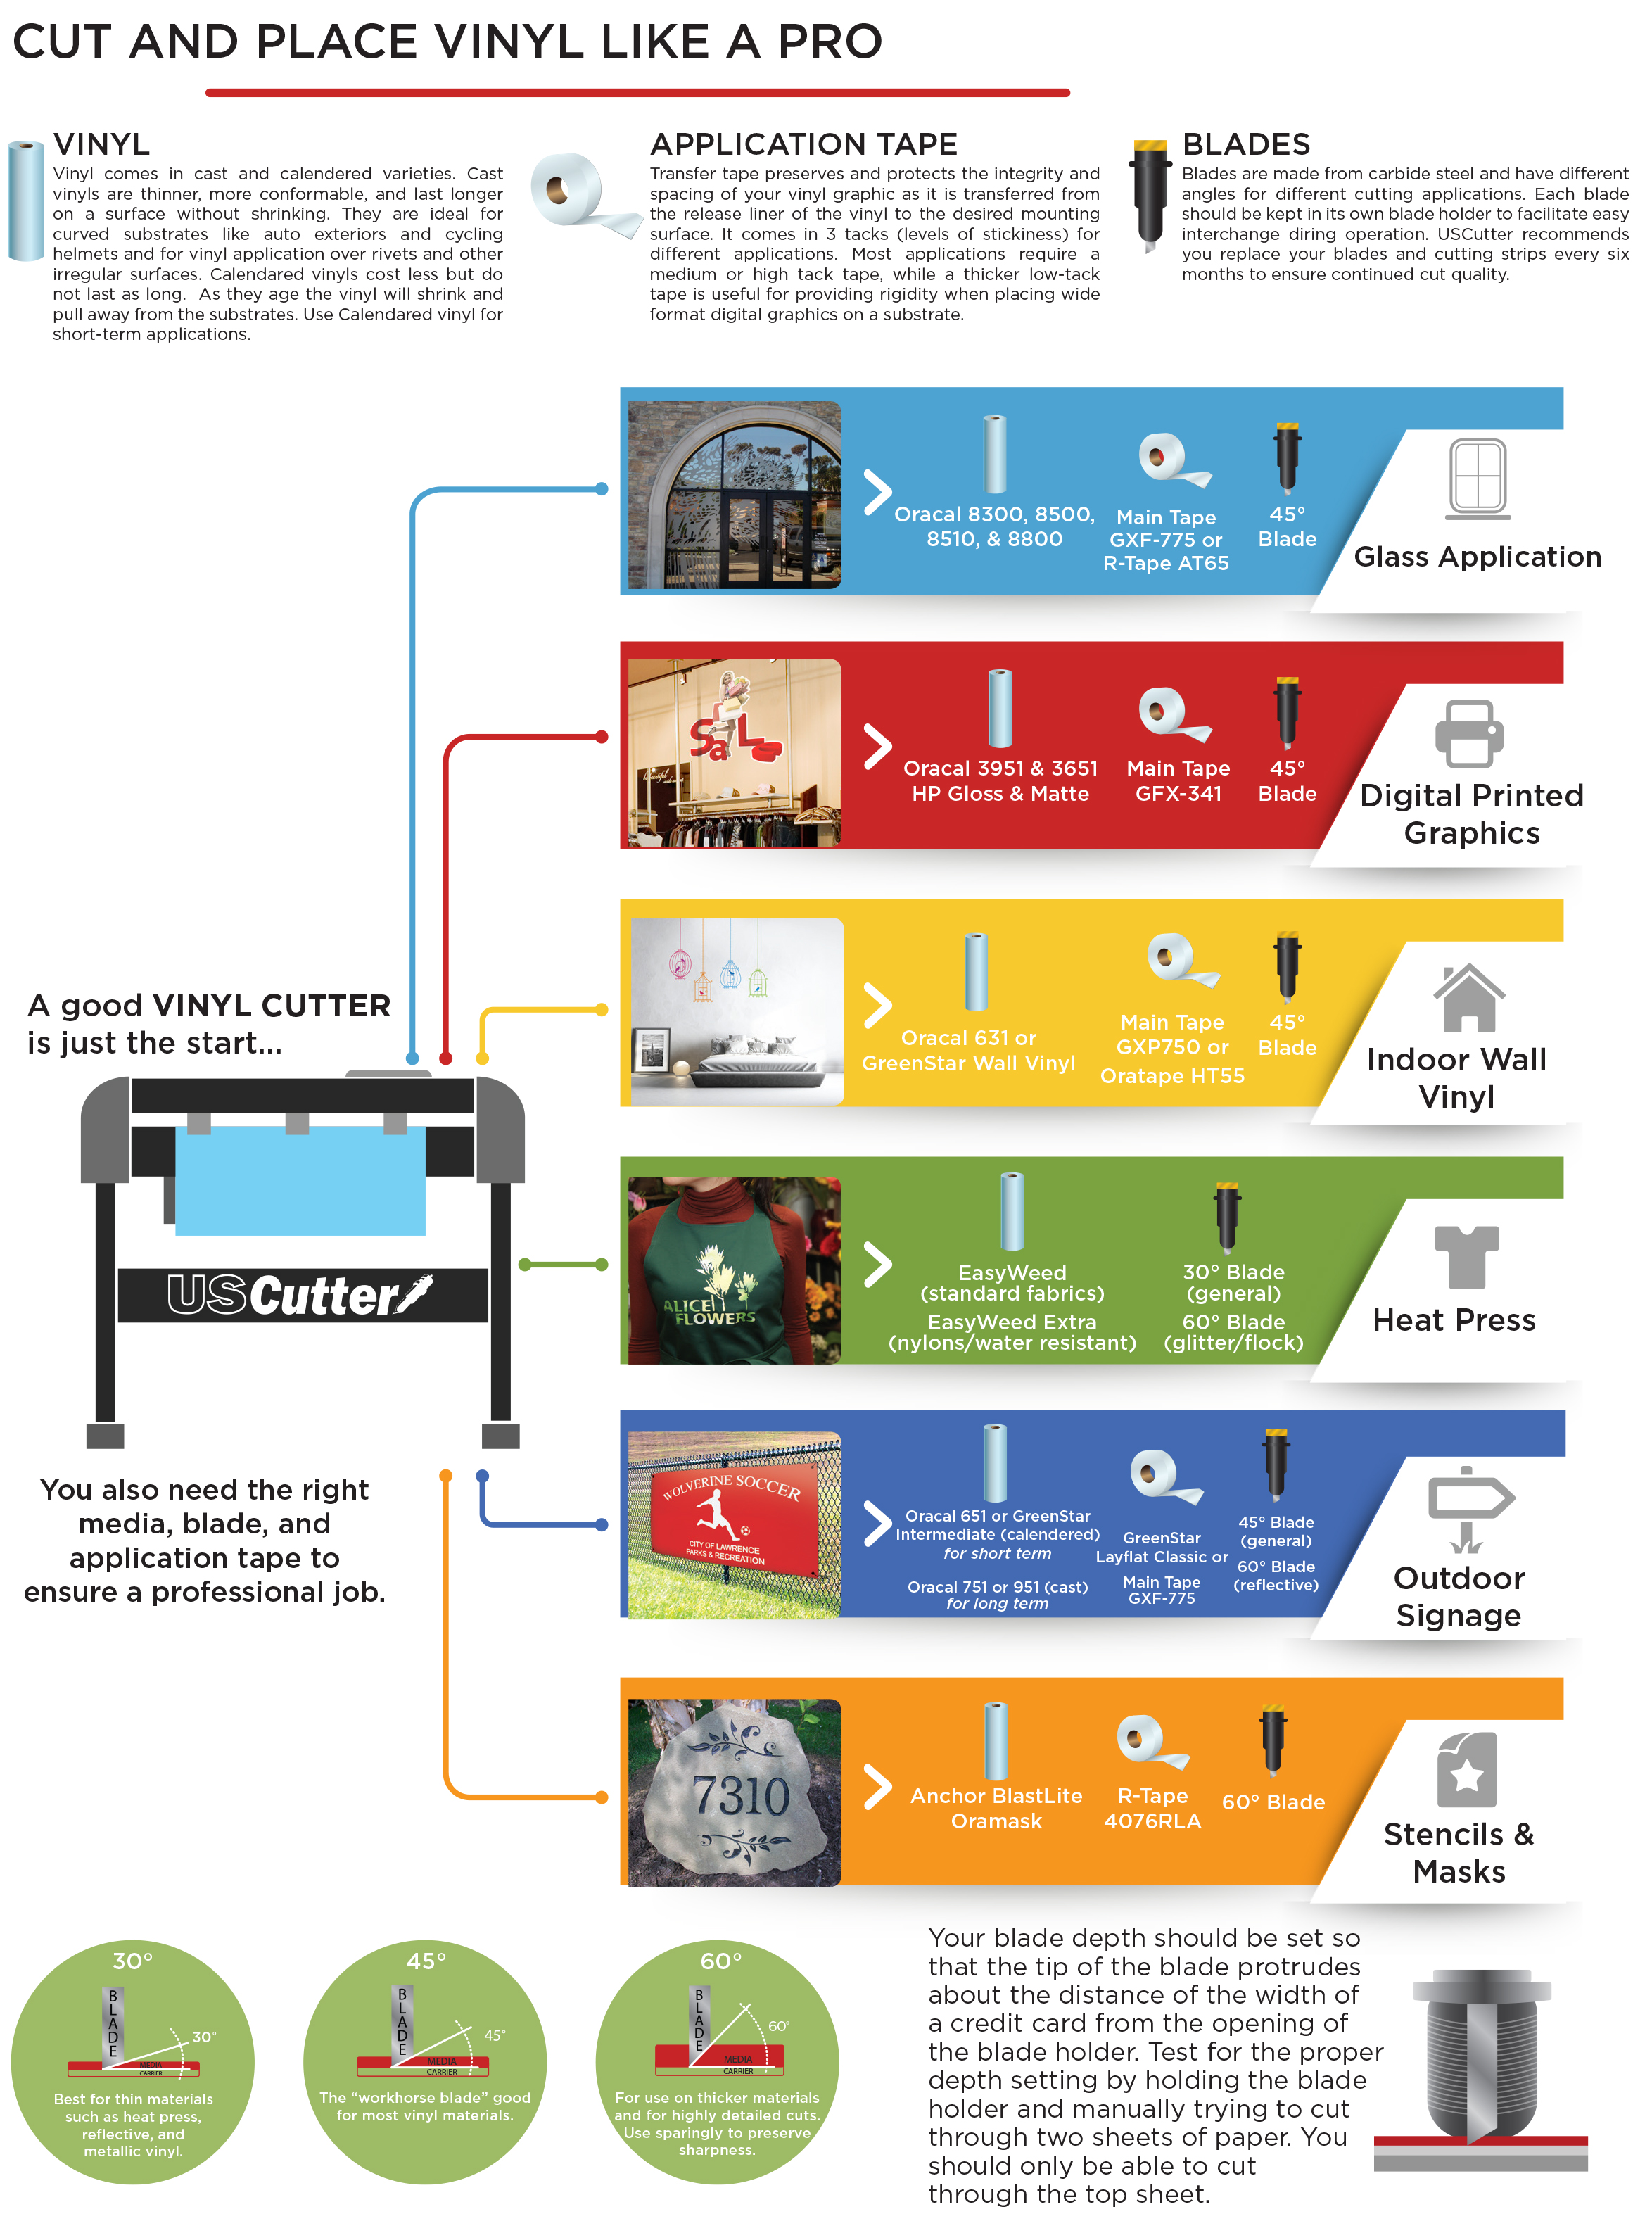
But once the vinyl cutter arrives in the mail, it may not be abundantly clear how to start making wonderful things. DON’T PANIC! Everything starts with the vinyl cutter, it’s the star of the show. But there’s a whole supporting cast of loveable materials, and each one of the players has to work together to make the whole production possible.
This USCutter infographic [printable pdf] introduces all the major actors: choosing the correct vinyl, the right application tape, and cutting blade to make any project possible, especially ones you may not even have thought had anything to do with vinyl. It’s designed to answer the question: “What do I need to make…”
Etched glass window designs… Contour-cut digital graphics for stickers… Lettering or decals for interior wall decoration… Letters and textured decals for t-shirts… Long-term outdoor signs and banners…
In last week’s episode, we discussed the proper angle blade to set in your vinyl cutter to match your desired material profile. In this installment we will explore the various application (or transfer) tapes that will marry your cut and weeded vinyl graphic to the mounting substrate or surface.
Application tape is a medium that protects and preserves the integrity of your cut and weeded graphic as it is transferred from the vinyl’s release liner to the desired substrate. It is basically a sticky film or paper tape (think masking tape) that comes in different tacks (levels of stickiness).
Certain tapes go better with certain vinyl finishes or different texture substrates. For our first illustration, let’s assume you’re a small sign shoppe and you have a customer who wants to post a sign on an exterior wall. He wants it to read: “Wildlings Keep Out!”
Use Oracal cast (751,951) or calendered (651) vinyl on outdoor surfaces, depending on the level of longevity and durability you require.
He’d like it to stand up to harsh conditions (in this case, wind and severe cold) for a while, and apply to a rough irregular surface. So you pick an Oracal 751 cast vinyl for the lettering. You cut and weed the graphic. Now you know this will have to be applied at an external location so you need to select a transfer tape (also called a pre-mask) to cover and protect the graphic for transport, and to facilitate the transfer at the location. These pre-masked graphics are called Ready-to-Apply (RTA) and require your tape have a certain feature: Lay Flat capability.
For this sign, you choose a pretty aggressive high-tack tape with Lay Flat capability, TransferRite 592U. The tape’s strong Lay Flat adhesive allows it to adhere to the exposed liner of the weeded graphic so that it can be stacked and stored and transported without curling up at the edges. It will also pull the vinyl off the liner no problem when it is ready to be used (the adhesive of the tape is lower tack than the vinyl adhesive so it will release the vinyl when it has been pressed against the substrate and won’t take it back up as the tape is being removed).
Now when your customer arrives at the site where he will be adhering his sign, a mission of stealth and secrecy, all he has to do is peel the liner off the vinyl, press the graphic against the wall, and squeegee from the center of the graphic to the edges. This activates the strong pressure-sensitive adhesive of the vinyl, securing it to the substrate, so he can now peel off the pre-mask at a 90 degree angle, and make his get-away, leaving the sign for all to see.
(NOTE: Application tapes have to be set onto a graphic using a squeegee to activate their pressure-sensitive adhesive, but check out this video on how to apply pre-mask to a vinyl graphic using an application roller. Works as another set of hands!)
In our second scenario, we have a shoppekeeper with a store full of fur parkas and snowboots. They’d like a graphic on the painted wall behind the cash register that says, “Stock Up Now Because Winter is Coming.” The vinyl to be used for this lettering will be Oracal 631, a matte finish calendered vinyl, that won’t glare too much under indoor lighting. To transfer this design off the backing, you want to use a milder high tack tape (OraTape HT55) or even medium tack tape (TransferRite 582U). The trick is it has to be strong enough to lift the matte finish vinyl (which is not easy) but not so strong that it tears the paint off the wall when you remove the tape.
The tapes thus far mentioned have all been fairly opaque paper tapes. Some users, esp. crafters, prefer clear tapes such as GreenStar Layflat Clear (a high-tack tape) for certain applications that require transparency such as putting down layers of different-colored vinyl for multi-color graphics, or for accurate registration of small details. Clear tapes are also a good choice for packaging and transporting RTA graphics so the customer can clearly see what they’re getting. USCutter also recommends clear tapes for window films (R-Tape AT65 or AT75, TransferRite 1320) where wet application is advised. Though paper tapes are usually preferred for wet application because they are porous and excess application fluid can escape, R-Tape AT75 has an embossed structure which allows fluid to be efficiently squeegeed out from beneath the tape and wiped off.
For the transfer of wide format printed digital graphics, USCutter recommends a thicker lower-tack film like TransferRite AirMask. This tape provides rigidity which makes the flimsy digital film easier to install and ensures the vinyl won’t stretch. It also won’t tear in a laminator so you can easily prep a graphic for on-site installation. Low-tack tapes are also advised for digital prints and screen prints where there is a concern that ink might be pulled off the graphic.
As you can see, there are many factors to consider when selecting the right transfer tape, and none of them are really fit, by themselves, to rule the 7 kingdoms. There are many claimants to the throne on the market and the lore surrounding them can be confusing (see USCutter’s product reviews on our application tape product pages as testament). To a large degree it’s a matter of the user’s preference which tape they will choose to marry, and there is a process of trial and error finding the right tape for your specific needs. Hopefully these tips and resources will arm you with resources, should it start to feel like trial by combat. Happy Cutting!
The right tape can ensure a successful wedding of graphic and substrate.